What is Random6 randomware? And how does it work?
Random6 ransomware is a file-encrypting threat that encrypts your files once it infects your computer. The targeted files of Random6 ransomware is marked by modifying their file names using unique character combinations like [random_characters] or [6_character_ID]. Once it gets into your computer, the ransomware assigns a specific ID on your computer to mark its victims. Fortunately, this ransomware does not employ an elaborate encryption algorithm and only uses Base64 which isn’t as strong like the other ones. It scans your computer for your personal files and appends four different file extensions on it, namely: .llawex, .dkdfln, .pmxkab, .upzbrf.
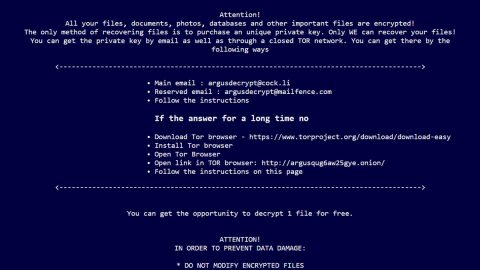
Once it is done encrypting your files, it changes your desktop background and then locks your screen. All you have to do to unlock it is to press Alt + F4. You will then encounter its ransom note which is opened through Notepad that contains the following message:
“Your files are Encrypted!
For decryption send letter on email [email protected] in letter attach your Personal ID.
If email don’t works, register here: http://bitmsg.me, send letter to BM-NBazWh9xNVf2SgmvLv8pc3Uc9CCXtXMu
With your Personal ID and email for contacts.
After you send payment to given BTC adress in answer, you will get your files restored.
Your Personal ID:
[128 RANDOM CHARACTERS]”
According to its ransom note, you have to pay a specific ransom that should be sent to [email protected] together with the specific ID it assigned to your computer. However, you should always remember this when you encounter ransomware infections: paying the ransom won’t guarantee the recovery of your files nor will the infection vanished in just a blink of an eye, in other words, it’s pretty much useless. What you have to do is to look for alternative ways to get rid of the ransomware infection such as the removal instructions that will be discussed later on.
How is Random6 ransomware distributed?
Random6 ransomware spreads via Trojans that are placed in corrupted torrent files that are found in torrent sites. Alternatively, it is also distributed through malicious applications or clicking on a corrupted link.
To remove Random6 ransomware, follow the removal instructions below:
Step 1: Hold down Alt + F4 simultaneously to unlock your computer screen.
Step 2: Open the Windows Task Manager by pressing Ctrl + Shift + Esc. Go to the Processes tab. Locate suspicious processes that can be related to the Random6 ransomware. Right-click on them and select Open File Location then scan them using any up-to-date antivirus. After opening each folder, end the infected processes and delete their folders.

Step 3: Open Control Panel by pressing Start key + R to launch Run and type appwiz.cpl in the search box and click OK.

Look for the Random6 ransomware or any suspicious program that might be related to it and then click Uninstall.

Step 4: Go to the System Configuration. To do so, click the Windows button and type msconfig in the search box and hit Enter Proceed to Startup and unmark items with an unknown manufacturer.

Step 5: Hold down Windows + E keys simultaneously.
Step 6: Go to the directories listed below and delete everything in it. Or other directories you might have saved the file related to the Random6 ransomware.
-
%USERPROFILE%\Downloads
-
%USERPROFILE%\Desktop
-
%TEMP%
Step 7: Look for RESTORE-extension-FILES.txt and RESTORE-[6_character_ID]-FILES.txt and any malicious executable file that could be related to Random6 ransomware.
Step 8: Right-click on it and click Delete.
Step 9: Open the Registry Editor, to do so, tap Win + R and type in regedit and then press enter.
Step 10: Locate the path below and check if there is a new suspicious entry.
HKEY_CURRENT_USER\Software\Microsoft\Windows\CurrentVersion\Run
Step 11: If there is a new suspicious entry that can be related to the Random6 ransomware and delete it.
Step 12: Close the Registry Editor.
Step 13: Empty the Recycle Bin.
Step 14: Restart your PC.
Step 15: Perform a full system scan using SpyRemover Pro.
-
Turn on your computer. If it’s already on, you have to reboot it.
-
After that, the BIOS screen will be displayed, but if Windows pops up instead, reboot your computer and try again. Once you’re on the BIOS screen, repeat pressing F8, by doing so the Advanced Option shows up.

-
To navigate the Advanced Option use the arrow keys and select Safe Mode with Networking then hit Enter.
-
Windows will now load the Safe Mode with Networking.
-
Press and hold both R key and Windows key.

-
If done correctly, the Windows Run Box will show up.
-
Type in explorer http://www.fixmypcfree.com/install/spyremoverpro
A single space must be in between explorer and http. Click OK.
-
A dialog box will be displayed by Internet Explorer. Click Run to begin downloading SpyRemover Pro. Installation will start automatically once download is done.

-
Click OK to launch SpyRemover Pro.
-
Run SpyRemover Pro and perform a full system scan.

-
After all the infections are identified, click REMOVE ALL.

-
Register SpyRemover Pro to protect your computer from future threats.